Creating And Saving Selection Masks Tutorials
Selections can be created in a number of ways. They can be created from the ground up using the selection marquee or lasso tools, or with painting tools by entering Quick Mask mode, or they can be based on the luminosity or the color data in the image. They can also be created from existing paths and path components. In ImageReady, you can create selections from slices.
To prevent an oval- or irregular-shaped selection from viewing and printing with a stair-stepping effect, you can create selections with feathering or anti-aliasing so that they lack hard edges, and select content gradually inward and outward from the selection boundary. The feathering can be specified before the selection is created or after the event; however, the anti-aliasing has to be specified before an oval or irregular selection is created.
Selections can be contiguous or non-contiguous. You can add to or subtract from existing selections and draw freehand or in straight lines and even horizontal or vertical lines. After a selection is created, you can hide it temporarily so that you can see the image that you are working on without being distracted by the animated selection outlines.
Selections are temporary by default but can be stored as grayscale images in alpha channels, loaded from the alpha channel at any time, or exported to another open document.
Note: Remember, not all file formats support alpha channels; the most popular file formats, PSD, PDF, TIFF, BMP, Targa, and Pixar do, but another very popular format, JPEG, does not.
Creating Circles and Squares Using Marquee Tools
You can create rectangular and elliptical selections easily in Photoshop by using the Rectangular Marquee or the Elliptical Marquee tools (M), respectively. However, odd as the omission might seem, Photoshop does not include dedicated selection tools for creating round, square, or round-cornered selections. The absence of such tools often throws off novice users. Therefore, the following hack is just for you if you happen to belong to such a group.
You have two ways of making a round or square selection. You can use the selection tools or the shape tools. Using the selection tools, take the following steps:
- Select the Elliptical or the Rectangular Marquee tool from the Toolbox.
- Press the Shift key. This action constrains the marquee to a circle or a square, depending on the active tool.
- Click in the document window and drag to form a round or square marquee, respectively.
For the second method, using the shape tools, take the following steps:
- Select the Rectangle or the Ellipse Shape tool (U).
- Select the Paths option for the tool from the options bar (it’s the second icon from the left, barring the tool icon).
- Press the Shift key. Doing so constrains the path to a circle or square, depending on the active tool.
- Click in the document window and drag to form a round or square path, respectively.
- Hold down Ctrl (Windows), cmd (Mac OS) and press Enter (Windows), Return (Mac OS) to create a selection from the path, or choose Make Selection from the Paths palette menu and have access to extra options.
At first sight, it can seem labor intensive to create a selection from a path. However, with a little practice, you can go through the steps without thinking.
Tip: To create rectangular or square selections with rounded corners in Photoshop, use the Rectangle Shape tool to draw a path and then create a selection from it (see step 5 in the preceding numbered list).
Color-Based Masks
The ability to make selections based on a particular color or hue can be very useful at times. For example, maybe you need to adjust or change the color of someone’s red shirt or blue jeans. You can do this by using the Magic Wand tool, but Photoshop includes a command that gives you more control over what is selected and what is not, as well as the ability to select highlights, midtones, shadows, and out-of-gamut colors. The command can be found in the Select menu and goes by the name Color Range (Figure 9-1).
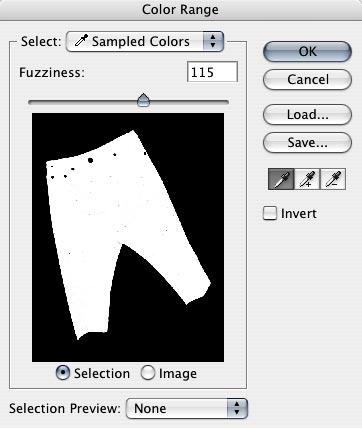 |
Figure 9-1: Use the Color Range command to select colors, highlights, midtones, shadows, and out-of-gamut colors. |
The Fuzziness setting in Color Range works in a slightly different way from how the Tolerance setting for the Magic Wand tool determines which pixels should be added to the selection. Whereas Tolerance determines the range of fully selected pixels, Fuzziness also determines the range of partially selected pixels. In other words, you can create more subtle masks with the Color Range command than you can with the Magic Wand tool, which is very good at selecting broad ranges of color.
When you enter the Color Range dialog box, a selection is made for you based on the foreground color. If you would rather start with a blank slate, press Alt (Windows), Opt (Mac OS) before you select the command. You can also limit the selection to a specific area by making a selection before you enter the Color Range dialog box.
In the dialog box, you can add or subtract from the selection by using the eyedropper tools. The sample tool is selected by default, and you can drag it in the document window to define the selection range. Rather than switch tools by clicking the icons, you can press Shift to add and Alt (Windows), Opt (Mac OS) to subtract from the selection range.
You can also use the eyedropper tools in the proxy window by selecting the Image button, next to the Selection button. The proxy window always shows a 100% magnification, and this can be useful if the complete image isn’t in view in the document window (though you can still use the options under the View menu and the related shortcuts to change the document magnification). Furthermore, you can choose from four types of previews, not including None, from the Selection Preview pop-up at the bottom of the dialog box.
In addition to using the eyedropper tools to define a selection range, you can choose from preset colors in the Select pop-up menu at the top of the dialog box. Note that The Out of Gamut range is based on the CMYK working space defined in Edit > Color Settings. When you leave the dialog box, the selection is applied for you.
Tip: To toggle between the Image and Selection previews, press Ctrl (Windows), cmd (Mac OS).
Luminosity-Based Masks
Selections based on the luminosity values contained in an image can be created from the composite or default color channels. They can be used to protect a range of levels from highlight to shadow when you apply adjustments and, with a bit of work, clamped to mask changes to extreme highlights, shadows, or midtones when you use them in adjustment layer masks.
You can base the mask on the composite channel by pressing Ctrl+Alt+Tilde (Windows), cmd+Opt+Tilde (Mac OS), or on the individual channels, including the composite, by Ctrl-clicking (Windows), cmd-clicking (Mac OS).
You can also convert a duplicate to Grayscale mode and use its single channel to load the selection, or to Lab mode and use the L channel, or to CMYK mode and use the K channel (each produces a slightly different mask).
After the selection is loaded, you can import it into the parent document. To do so, choose a selection tool, click in the selected area (the icon should change to a white arrow with an accompanying rectangular selection outline when you are over the selected area), and then drag the selection into the parent document. Hold down the Shift key when the mask is over the target window to center the selection.
Having loaded the selection, you can use the adjustment commands, such as Curves or Hue/Saturation, directly on a layer or create an adjustment layer and have the mask applied automatically.
By default, the highlights are selected and the shadows masked. You can easily inverse the selection by choosing Select > Inverse, or Ctrl+Shift+I (Windows), cmd+Shift+I (Mac OS).
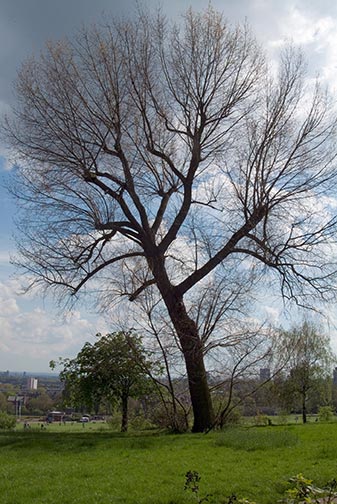
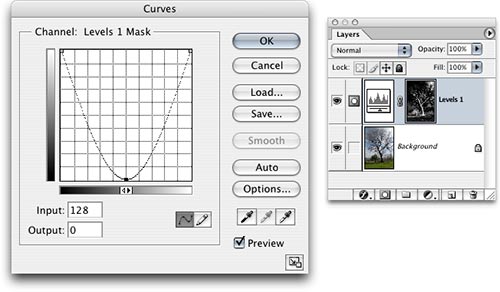
To clamp or restrict the luminosity mask, save it as an alpha channel and then apply a curve that basically clips the highlight, midtone, or shadow values Likewise, if the luminosity mask was loaded in an adjustment layer mask, target the mask and then use Curves to restrict the adjustment’s influence on the layer content (Figure 9-2).
 |
 |
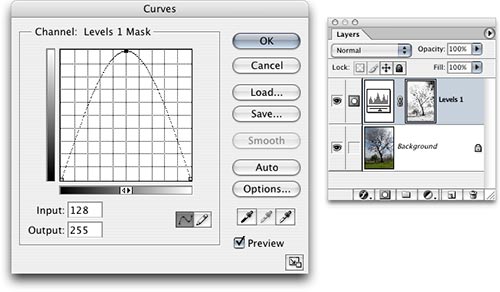 |
Fgure 9-2: A luminosity mask loaded in a layer mask and then a curve used to restrict the mask to A. midtones, B. highlights, and shadows. |
Channel-Based Masks
When you’re creating a selection, channels are often good candidates for the basis of a mask, and in some images, one might yield a mask without much work. For example, you might have an image of a red building against a blue sky. By finding the channel that contains the strongest contrast between the red and blue, you can create a copy of the channel, increase the contrast and "discover" a mask (Figure 9-3). To view individual channels, click each one in turn in the Channels palette. It helps to view them as grayscale when evaluating channel content. If you are seeing them in color, choose Preferences > Display & Cursors and deselect the option Color Channels in Color. When you find a likely candidate for a mask, create a copy by dragging it to the Create New Channel button, located next to the Trash in the Channels palette.
Defining a Selection from an Exact Center Point
When you use the marquee tools to define a selection, the starting point is always the top-left corner of a rectangular selection or, in the case of an elliptical selection, an imaginary rectangular box. This can be problematic if what you want to do is to center the selection on an exact center point. For example, having drawn a circular object, you might want the selection to center on the epicenter of the object in order to adjust it. The workaround is to define the epicenter of the object, or of the first selection if you intend to overlap two selections, by using guides and then draw outward from the epicenter.
To find the epicenter of an existing object, take the following steps:
Defining an Aspect Ratio for a Selection
The Rectangular and the Elliptical Marquee tools have some options that are often overlooked. You can preset their width and height to a fixed size or define a width-to-height ratio. For example, if you want to create a marquee that’s three times as wide as it is high, click the Style pop-up menu in the options bar (Figure 9-4), select Fixed Aspect Ratio, and then enter 3 in the Width text field and 1 in the Height text field. Now, when you drag with the marquee tool, your selection will be three times as wide as it is high.
When you’re creating a selection, channels are often good candidates for the basis of a mask, and in some images, one might yield a mask without much work. For example, you might have an image of a red building against a blue sky. By finding the channel that contains the strongest contrast between the red and blue, you can create a copy of the channel, increase the contrast and "discover" a mask (Figure 9-3). To view individual channels, click each one in turn in the Channels palette. It helps to view them as grayscale when evaluating channel content. If you are seeing them in color, choose Preferences > Display & Cursors and deselect the option Color Channels in Color. When you find a likely candidate for a mask, create a copy by dragging it to the Create New Channel button, located next to the Trash in the Channels palette.
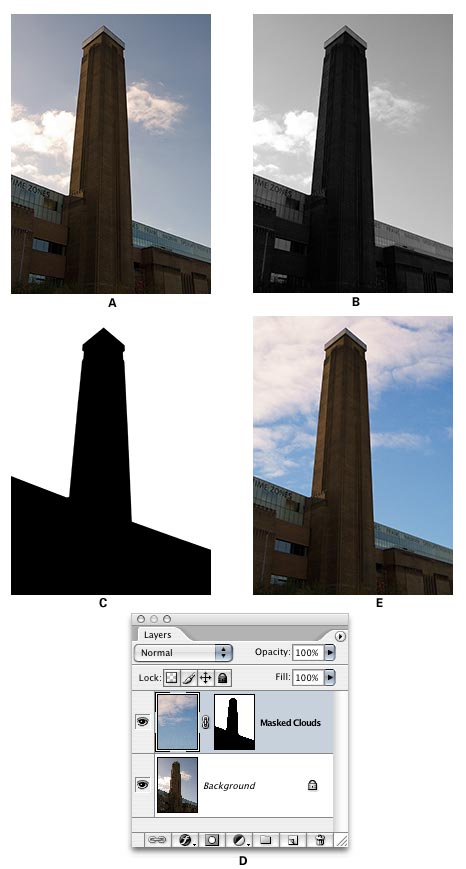 |
Figure 9-3: A. An image of the Tate Modern Gallery (London) that could benefit from having the burned out clouds replaced. B. A copy of the blue channel used as the basis for a mask. C. Levels used to crush shadows, expand highlights, and then stray levels painted with white and black to perfect the mask. D. Mask applied to a clouds layer. E. Final image minus burned-out clouds. |
The copied channel might need a little bit of work to perfect the mask, which you can do easily with the Brush tool by painting with black or white (see "Using Painting Tools and Filters," later in the chapter). When you are happy with the mask, Ctrl-click (Windows), cmd-click (Mac OS) to load it as a selection.
In addition to the Brush tool, you can use the Dodge and Burn tools on the channel to lighten or to darken detail around the mask’s edges. To do so, select the corresponding range on the options bar (Shadows, Midtones, or Highlights) and then apply to remove unwanted detail. This way, you can preserve the mask edge while sending unwanted detail on either side of the edge to black or to white. This technique is particularly useful when you’re creating masks with irregular edges, such as hair.
Tip: You can use keyboard shortcuts to switch between the ranges for the Dodge and Burn tools. Shadows: Alt+Shift+S (Windows), Opt+Shift+S (Mac OS); Midtones: Alt+Shift+M (Windows), Opt+Shift+M (Mac OS); Highlights: Alt+Shift+H (Windows), Opt+Shift+H (Mac OS). You can also temporarily switch between the tools by holding down Alt (Windows), Opt (Mac OS).In addition to the Brush tool, you can use the Dodge and Burn tools on the channel to lighten or to darken detail around the mask’s edges. To do so, select the corresponding range on the options bar (Shadows, Midtones, or Highlights) and then apply to remove unwanted detail. This way, you can preserve the mask edge while sending unwanted detail on either side of the edge to black or to white. This technique is particularly useful when you’re creating masks with irregular edges, such as hair.
Defining a Selection from an Exact Center Point
When you use the marquee tools to define a selection, the starting point is always the top-left corner of a rectangular selection or, in the case of an elliptical selection, an imaginary rectangular box. This can be problematic if what you want to do is to center the selection on an exact center point. For example, having drawn a circular object, you might want the selection to center on the epicenter of the object in order to adjust it. The workaround is to define the epicenter of the object, or of the first selection if you intend to overlap two selections, by using guides and then draw outward from the epicenter.
To find the epicenter of an existing object, take the following steps:
- Activate the layer for the object.
- Press Ctrl+T (Windows), cmd+T (Mac OS) to activate the object’s bounding box. Alternatively, select the Move tool (M) and select Show Transform Controls on the options bar.
- Make sure that rulers are showing (View > Rulers) and then drag from the ruler to create a guide and let it snap to the fulcrum icon; do the same from both rulers. You should now have a cross over the epicenter of the object.
- Press Esc if you used the transform command in step 2.
- Having defined the epicenter, choose a selection tool (it helps to have Other Cursors in Preferences > Display and Cursors set to Precise for the next step).
- Hover over the cross formed by the guides and position the pointer on the epicenter; use the change in color of the tool icon to guide you to the epicenter.
- Hold down Alt (Windows), Opt (Mac OS) and draw outward.
Defining an Aspect Ratio for a Selection
The Rectangular and the Elliptical Marquee tools have some options that are often overlooked. You can preset their width and height to a fixed size or define a width-to-height ratio. For example, if you want to create a marquee that’s three times as wide as it is high, click the Style pop-up menu in the options bar (Figure 9-4), select Fixed Aspect Ratio, and then enter 3 in the Width text field and 1 in the Height text field. Now, when you drag with the marquee tool, your selection will be three times as wide as it is high.
 |
Figure 9-4: Choosing a style for the Rectangular Marquee tool from the options bar. |
If you need to crop an image by a given number of pixels using the Crop command, as opposed to the Crop tool, you can define the marquee from the same Style pop-up menu. Just select Fixed Size and then enter the pixel dimensions. You can set the width and height in any of the supported units (pixels, inches, cm, mm, points, picas, and percent).
When you enter values in text fields on the options bar, you can right-click (Windows), Ctrl-click (Mac OS) in the box and choose from the supported units in the pop-up menu. Furthermore, you are not restricted to whole numbers but can use fractions. For example, you can choose an aspect ratio for 1.85 to 1.
If you use a particular fixed size or aspect ratio repeatedly, save it as a tool preset by clicking the tool icon on the options bar and then choosing New Tool Preset from the pop-up Tool Preset Picker menu; give it a memorable name for easier identification.
Irregular Selections
One way to create irregular selections is by using the lasso tools. The other way, less intuitive but more exciting, is to use filters. Although you cannot define a selection with a filter, you can modify it (Figure 9-5). Try the following:
- Create a new document.
- Create a selection with the Rectangular Marquee tool.
- Choose Select > Modify > Border and enter a value that looks good for the marquee size.
- Press Q to enter Quick Mask Mode.
- Choose Filter > Distort > Wave and play with the settings.
- Exit the Wave dialog box and then press Q to exit Quick Mask mode.
- Create a new layer and fill the selection with a color.
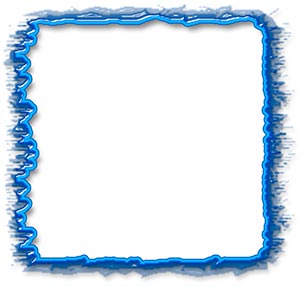 |
Figure 9-5: A rectangular selection modified by invoking Quick Mask mode, stacking filter effects in the Filter Gallery dialog box, and then applying a style. |
Try other filters on differently shaped selections. Also, try reapplying the filters or stacking filter effects using a combination of filters. You can do that in the Filter Gallery dialog box (Filter > Filter Gallery) by clicking the New Effect Layer icon, located at the bottom of the window, and then applying another filter.
Selection from a Work Path
Using paths to create selections opens a number of options. Should you need to make a selection with rounded corners, you can use the Ellipse Shape tool to define a path and then load it as a selection. You can also use the Pen tool to create a very precise path and then load that as a selection. Furthermore, you can load path components as selections.
To create a selection from a work path, take the following step:
Tip: The converse to creating a selection from a path is also possible. To create a path from a selection, select Create Work Path from the Paths palette menu and enter a tolerance value between 0.5 and 10. The lower the value, the more accurately the path will follow the selection edges.
Feathered Selections
When you use a selection to make compilations of images, extract elements from their background, apply edits, or make tonal adjustments, feathering can help to blend the object being worked upon into the background by creating a soft edge around the selection edge. The soft edge is not unlike the anti-aliasing applied to elliptical and irregular selections. However, it differs in one respect. It extends inward and outward from the selection edge, whereas anti-aliasing creates a soft transitional zone only on the inside of the selection edge (Figure 9-6).
Selection from a Work Path
Using paths to create selections opens a number of options. Should you need to make a selection with rounded corners, you can use the Ellipse Shape tool to define a path and then load it as a selection. You can also use the Pen tool to create a very precise path and then load that as a selection. Furthermore, you can load path components as selections.
To create a selection from a work path, take the following step:
- Draw a path with the pen or shape tools (if it’s a complex path, remember to save it from the Paths palette menu).
- Hold down Ctrl (Windows) and press Enter, or hold down cmd and press Return (Mac OS). You can also click the Load Path as a Selection button in the Paths palette (located third from left).
Tip: The converse to creating a selection from a path is also possible. To create a path from a selection, select Create Work Path from the Paths palette menu and enter a tolerance value between 0.5 and 10. The lower the value, the more accurately the path will follow the selection edges.
Feathered Selections
When you use a selection to make compilations of images, extract elements from their background, apply edits, or make tonal adjustments, feathering can help to blend the object being worked upon into the background by creating a soft edge around the selection edge. The soft edge is not unlike the anti-aliasing applied to elliptical and irregular selections. However, it differs in one respect. It extends inward and outward from the selection edge, whereas anti-aliasing creates a soft transitional zone only on the inside of the selection edge (Figure 9-6).
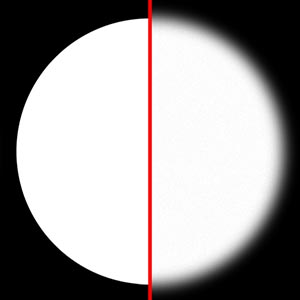 |
Figure 9-6: Left. Anti-aliased circular selection filled with black. Right. Selection feathered by 6 pixels and then filled with white. |
You can apply feathering before you create the selection by specifying it in the options bar or after the event by choosing Select > Feather, or Ctrl+Alt+D (Windows), cmd+Opt+D (Mac OS).
One popular use of feathering involves the use of an elliptical, feathered selection to create a vignette (Figure 9-7). The following steps will create a vignette and add a new background and watermarks around the vignette.
One popular use of feathering involves the use of an elliptical, feathered selection to create a vignette (Figure 9-7). The following steps will create a vignette and add a new background and watermarks around the vignette.
- Make sure that the image is on a normal layer and not a Background layer.
- Select the Elliptical Marquee tool and enter a value in the Feather text box. The figure that you enter will, of course, depend on the pixel dimensions of the image and size of the soft edge you desire.
- Make the selection and then choose Select > Inverse. Doing so masks the areas that you want to conserve and exposes the peripheral areas.
- Press Backspace (Windows), Delete (Mac OS) to delete the peripheral areas.
- Add a new layer below the image layer and fill it with a solid color of your choice.
- Finally, to add strokes around the vignette, create a new layer above the image layer and apply strokes to rectangular or elliptical selections.
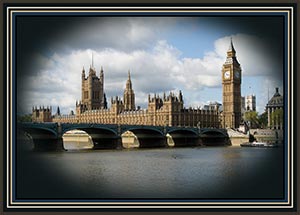 |
Figure 9-7: A vignette created by applying an elliptical selection to an image on a normal layer. |
Feathering, though essential, can be notoriously difficult to see, making it difficult to judge which parts of the image will be affected or, indeed, how much feathering you should apply in the first place. This is because the marquee shows only the parts of the mask that are 50% or more opaque. To have a more precise idea of how the feathering tapers off, take the following steps:
Photoshop includes one other method for applying feathering. The end result differs slightly from the feathering applied via the Select menu or the options for the marquee tools. To take advantage of it, after creating the selection, enter Quick Mask mode and then apply Filter > Blur > Gaussian Blur. You can also apply the other blur filters to vary the effect or to create special effects. For example, if you are making compilations, rather than settle for just a soft edge, try a Shape Blur (Figure 9-8).
- Create a selection and apply feathering (see preceding paragraphs).
- Press Q to enter into Quick Mask mode.
Photoshop includes one other method for applying feathering. The end result differs slightly from the feathering applied via the Select menu or the options for the marquee tools. To take advantage of it, after creating the selection, enter Quick Mask mode and then apply Filter > Blur > Gaussian Blur. You can also apply the other blur filters to vary the effect or to create special effects. For example, if you are making compilations, rather than settle for just a soft edge, try a Shape Blur (Figure 9-8).
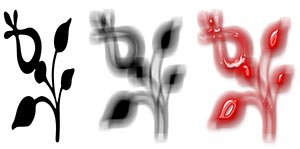 |
Figure 9-8: A Shape Blur applied to an object and then a Layer Style added for good measure. |
Saving a Selection with a File
Regardless of the method you use to create a selection, they are temporary affairs and can disappear altogether if Photoshop quits for some reason or you have a system freeze and have to shut down. To avoid having to recreate a selection that you have spent hours creating, you can convert it to an alpha channel and save it in the file. You then have the option of loading the selection at any time. Alpha channels do add to file size, but the tradeoff is more than worth it for the time that can be saved not having to recreate the selection down the line.
To save a selection, take the following steps:
With the selection active, choose Select > Save Selection, or click the Save Selection as Channel button in the bottom of the Channels palette (second from left).
If you intend to save more than one selection, give the alpha channel a name. You can do it by double-clicking the default name or pressing Alt (Windows), Opt (Mac OS) before you click the Save Selection as Channel button and then entering a name in the New Channel dialog box.
Save the file—especially if the selection took you more than a few seconds to make!
As mentioned earlier in the chapter, not all file formats support alpha channels. However, the most popular formats, such as PSD, PDF, TIFF, BMP, PICT, Targa, and Pixar do support alpha channels.
Comments
Post a Comment
Please register before posting your comment here !!