HDR - High Dynamic Range Tutorials
Adobe Photoshop CS3
Contrary to popular opinion – what you see is not what you always get. You may be able to see the detail in those dark shadows and bright highlights when the sun is shining – but can your CCD or CMOS sensor? Contrast in a scene is often a photographer’s worst enemy. Contrast is a sneak thief that steals away the detail in the highlights or shadows (sometimes both).
A wedding photographer will deal with the problem by using fill-flash to lower the subject contrast; commercial photographers diffuse their own light source or use additional fill lighting and check for missing detail using the ‘Histogram’. Sometimes, however, there is not enough fill light to resolve the problem, so the photographer has to resort to taking multiple exposures (bracket the exposures) and then merge detail from each in a new composite image.
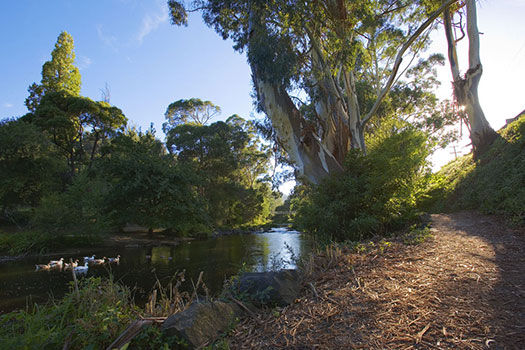

Photoshop’s Merge to HDR (High Dynamic Range) automated feature has been improved for CS3, but it is still not able to merge exposures where subjects have moved between the separate exposures. The technique in this tutorial (taken from the new Photoshop CS3: Essential Skills book) shows you how to resolve this problem. This technique also offers superior midtone contrast than Photoshop’s merge to HDR automated feature.
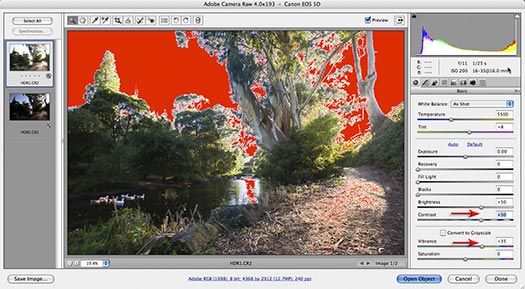
STEP 1
Open two different exposures of the same scene in Adobe Camera RAW. Click on the lighter image thumbnail and optimize the shadow detail (pay no attention to the highlights that will clip).
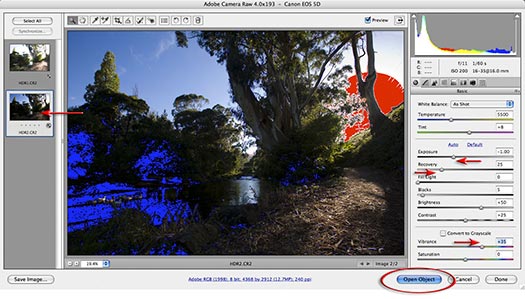
STEP 2
Click on the darker thumbnail and this time optimize the highlight detail. Click on Select All in the top left-hand corner of the ACR dialog box and while holding down the Shift key click on the Open Objects button. The two images will now open as Smart Objects.
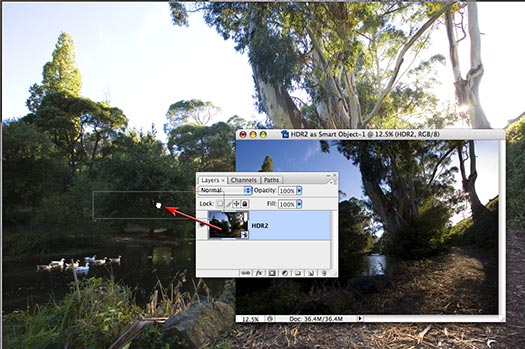
STEP 3
Select the ‘Move tool’ in the Tools palette and drag the dark underexposed image into the window of the lighter overexposed image (alternatively just drag the thumbnail from the Layers palette with any tool selected). Holding down the Shift key as you let go of the image will align the two layers (but not necessarily the two images).
STEP 4
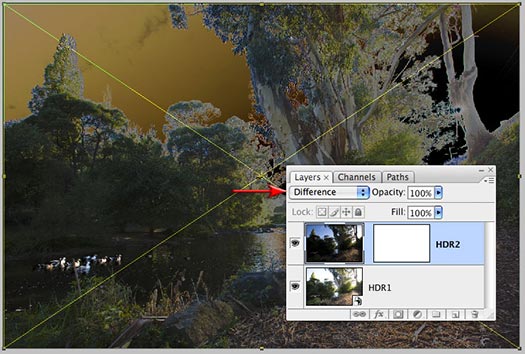
In the Layers palette set the blend mode of the top layer to ‘Difference’ to check the alignment of the two images. If they align no white edges will be apparent (usually the case if the tripod was sturdy and the two exposures were made via an auto timer feature or cable release). If the layers are not perfectly aligned you may need to nudge the layers into alignment using Free Transform as the new Auto-Align Layers command does not work with two Smart Object layers.
STEP 5
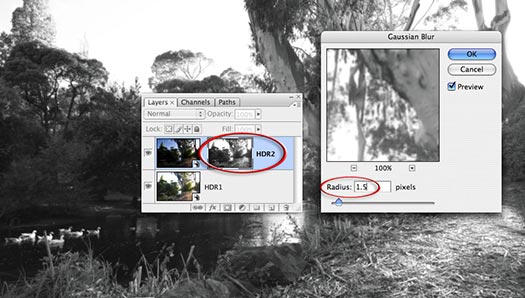
Click on the Add layer mask icon in the Layers palette. Switch off the visibility of this layer by clicking on the eye icon next to the layer thumbnail. Choose ‘All’ from the Select menu (Ctrl/Command+A) and then choose Copy Merged from the Edit menu (Shift+Ctrl/Command+C). Hold down the Alt/Option key and click on the layer thumbnail. The image window should appear white as the layer mask is empty. Now choose ‘Paste’ from the Edit menu (Ctrl/Command+V). Apply a 1.5-pixel Gaussian Blur (Filter > Blur > Gaussian Blur) to this mask before. Alt/Command+click to return to the normal view.
STEP 6
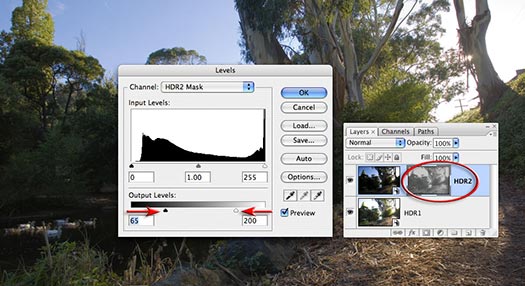
It is important to recreate the expanded contrast of the original scene otherwise the image will look slightly surreal if the overall contrast is low. The first technique to expand the contrast is to select the Layer mask and apply a Levels adjustment (Ctrl/Command+L). Drag in the Output sliders (directly beneath the Shadow and Highlight sliders) until the final contrast appears high but not clipped (lowering the contrast of the mask increases the contrast of the final image).
STEP 7
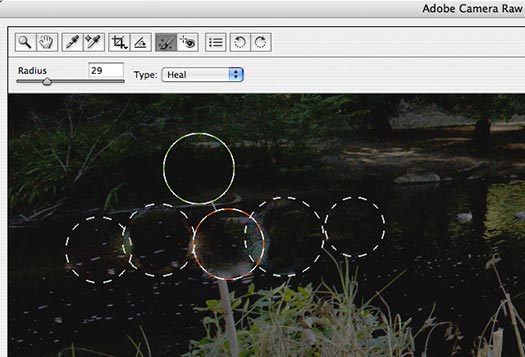
Anything that moves in the time difference that it takes to make the two exposures will create a ghost image of itself. Any ghosting can be removed using the new Retouch tool in Adobe Camera Raw. Double-click the layer thumbnail of the top layer, or smart object, in the Layers palette to open the image in the ACR dialog box. Use the Retouch Tool in the ACR dialog box to remove any object that has moved between the two exposures. If the heal area becomes contaminated with pixels from adjacent pixels of a very different color or tone, switch from Heal to Clone in the Type options. Select OK to apply the changes.
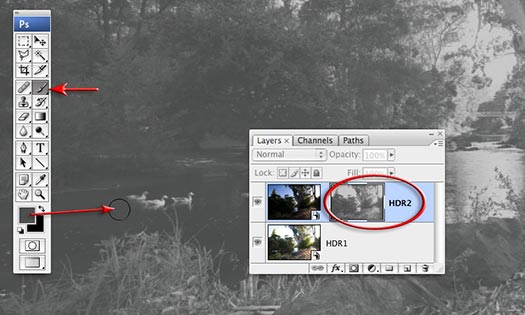
STEP 8
As we have already created a mask the ghost image is also present in the layer mask as well as the smart object. Hold down the Alt/Option key and click on the layer mask thumbnail. Select the Brush Tool and hold down the Alt/Option key and click on a tone next to the objects to be removed. Paint over any areas of the image where ghosting was occurring using a soft-edged brush. Click on the Image thumbnail to return to the normal view. The ghosts will now be gone.
STEP 9
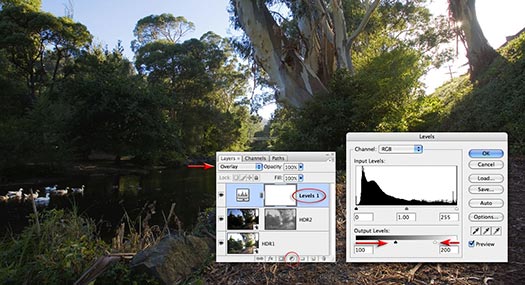
From the Create new fill or adjustment layer menu in the Layers palette hold down the Alt/Option key and select a Levels adjustment layer. From the new Layer dialog box select the Overlay or Soft Light mode. In the Levels dialog box drag the two output sliders towards the center of the gray ramp to limit the increase in contrast to just the midtones (levels 100 to 200).
STEP 10
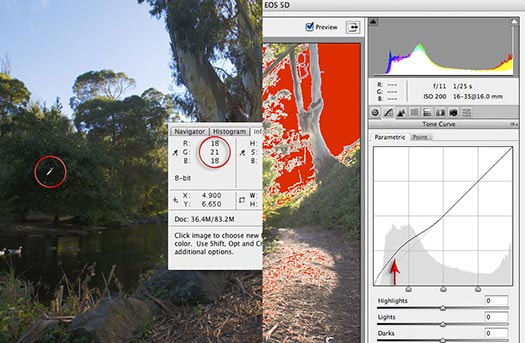
Open the Info palette and look at the RGB values when the mouse cursor is positioned over the dark shadow tones in the image window. If they are too dark to print to a typical output device (below level 15), you can double-click the bottom Smart Object to reopen the ACR dialog box. In the Tone Curve tab raise the shadow values as required. Select OK to apply the changes.
STEP 11
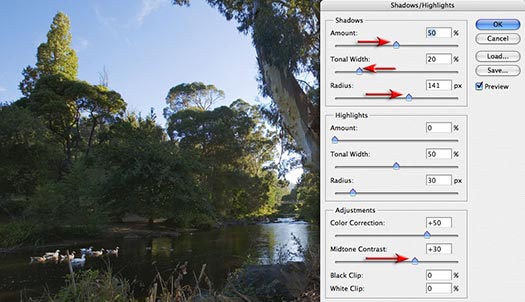
One way of controlling luminance and contrast in the shadows is to apply a Shadow/Highlight adjustment to the base Smart Object (Image > Adjustments > Shadow/Highlight). Both the Midtone contrast slider and the Radius slider in the Shadows section can be used to control the localized contrast in the shadows. Select OK to apply this adjustment as a smart filter to the smart object.
STEP 12
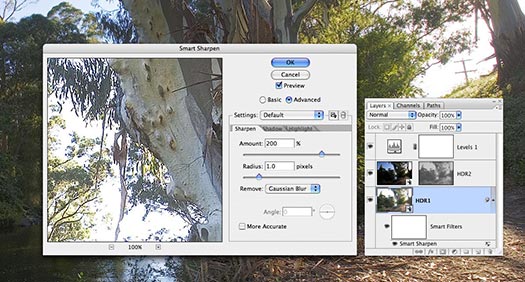
Complete the project by adding a Smart Sharpen filter to the same Smart Object, as this is where the bulk of the fine detail resides in this composite image. Select OK to apply the changes. Applying a sharpen filter to this smart object (a camera Raw file) instead of a rasterized layer (created by merging the visible elements to a new layer) means that we have deferred applying any ‘destructive’ changes to the image data in this file. The automated HDR feature would have to process the data to achieve the same result and the ducks would not be happy.

Contrary to popular opinion – what you see is not what you always get. You may be able to see the detail in those dark shadows and bright highlights when the sun is shining – but can your CCD or CMOS sensor? Contrast in a scene is often a photographer’s worst enemy. Contrast is a sneak thief that steals away the detail in the highlights or shadows (sometimes both).
A wedding photographer will deal with the problem by using fill-flash to lower the subject contrast; commercial photographers diffuse their own light source or use additional fill lighting and check for missing detail using the ‘Histogram’. Sometimes, however, there is not enough fill light to resolve the problem, so the photographer has to resort to taking multiple exposures (bracket the exposures) and then merge detail from each in a new composite image.


Photoshop’s Merge to HDR (High Dynamic Range) automated feature has been improved for CS3, but it is still not able to merge exposures where subjects have moved between the separate exposures. The technique in this tutorial (taken from the new Photoshop CS3: Essential Skills book) shows you how to resolve this problem. This technique also offers superior midtone contrast than Photoshop’s merge to HDR automated feature.

STEP 1
Open two different exposures of the same scene in Adobe Camera RAW. Click on the lighter image thumbnail and optimize the shadow detail (pay no attention to the highlights that will clip).

STEP 2
Click on the darker thumbnail and this time optimize the highlight detail. Click on Select All in the top left-hand corner of the ACR dialog box and while holding down the Shift key click on the Open Objects button. The two images will now open as Smart Objects.

STEP 3
Select the ‘Move tool’ in the Tools palette and drag the dark underexposed image into the window of the lighter overexposed image (alternatively just drag the thumbnail from the Layers palette with any tool selected). Holding down the Shift key as you let go of the image will align the two layers (but not necessarily the two images).

STEP 4
In the Layers palette set the blend mode of the top layer to ‘Difference’ to check the alignment of the two images. If they align no white edges will be apparent (usually the case if the tripod was sturdy and the two exposures were made via an auto timer feature or cable release). If the layers are not perfectly aligned you may need to nudge the layers into alignment using Free Transform as the new Auto-Align Layers command does not work with two Smart Object layers.

STEP 5
Click on the Add layer mask icon in the Layers palette. Switch off the visibility of this layer by clicking on the eye icon next to the layer thumbnail. Choose ‘All’ from the Select menu (Ctrl/Command+A) and then choose Copy Merged from the Edit menu (Shift+Ctrl/Command+C). Hold down the Alt/Option key and click on the layer thumbnail. The image window should appear white as the layer mask is empty. Now choose ‘Paste’ from the Edit menu (Ctrl/Command+V). Apply a 1.5-pixel Gaussian Blur (Filter > Blur > Gaussian Blur) to this mask before. Alt/Command+click to return to the normal view.

STEP 6
It is important to recreate the expanded contrast of the original scene otherwise the image will look slightly surreal if the overall contrast is low. The first technique to expand the contrast is to select the Layer mask and apply a Levels adjustment (Ctrl/Command+L). Drag in the Output sliders (directly beneath the Shadow and Highlight sliders) until the final contrast appears high but not clipped (lowering the contrast of the mask increases the contrast of the final image).

STEP 7
Anything that moves in the time difference that it takes to make the two exposures will create a ghost image of itself. Any ghosting can be removed using the new Retouch tool in Adobe Camera Raw. Double-click the layer thumbnail of the top layer, or smart object, in the Layers palette to open the image in the ACR dialog box. Use the Retouch Tool in the ACR dialog box to remove any object that has moved between the two exposures. If the heal area becomes contaminated with pixels from adjacent pixels of a very different color or tone, switch from Heal to Clone in the Type options. Select OK to apply the changes.

STEP 8
As we have already created a mask the ghost image is also present in the layer mask as well as the smart object. Hold down the Alt/Option key and click on the layer mask thumbnail. Select the Brush Tool and hold down the Alt/Option key and click on a tone next to the objects to be removed. Paint over any areas of the image where ghosting was occurring using a soft-edged brush. Click on the Image thumbnail to return to the normal view. The ghosts will now be gone.

STEP 9
From the Create new fill or adjustment layer menu in the Layers palette hold down the Alt/Option key and select a Levels adjustment layer. From the new Layer dialog box select the Overlay or Soft Light mode. In the Levels dialog box drag the two output sliders towards the center of the gray ramp to limit the increase in contrast to just the midtones (levels 100 to 200).

STEP 10
Open the Info palette and look at the RGB values when the mouse cursor is positioned over the dark shadow tones in the image window. If they are too dark to print to a typical output device (below level 15), you can double-click the bottom Smart Object to reopen the ACR dialog box. In the Tone Curve tab raise the shadow values as required. Select OK to apply the changes.

STEP 11
One way of controlling luminance and contrast in the shadows is to apply a Shadow/Highlight adjustment to the base Smart Object (Image > Adjustments > Shadow/Highlight). Both the Midtone contrast slider and the Radius slider in the Shadows section can be used to control the localized contrast in the shadows. Select OK to apply this adjustment as a smart filter to the smart object.

STEP 12
Complete the project by adding a Smart Sharpen filter to the same Smart Object, as this is where the bulk of the fine detail resides in this composite image. Select OK to apply the changes. Applying a sharpen filter to this smart object (a camera Raw file) instead of a rasterized layer (created by merging the visible elements to a new layer) means that we have deferred applying any ‘destructive’ changes to the image data in this file. The automated HDR feature would have to process the data to achieve the same result and the ducks would not be happy.

by Mark Galer

Comments
Post a Comment
Please register before posting your comment here !!