Pen Tool Tutorials
Creating Selections With Photoshop's Pen Tool
The Pen Tool is often used in the creation of sophisticated smooth-edged selections, but strictly speaking it is not one of the selection tools. The Pen Tool creates vector paths instead of selections; these, however, can be converted into selections that in turn can be used to extract or mask groups of pixels.
The Pen Tool has an unfortunate reputation — neglected by most, considered an awkward tool by those who have made just a passing acquaintance, and revered by just a select few who have taken a little time to get to know ‘the one who sits next to Mr Blobby’ (custom shape icon) in the Tools palette.
Who exactly is this little fellow with the ‘ye olde’ ink nib icon and the awkward working persona? The Pen Tool was drafted into Photoshop from Adobe Illustrator. Although graphic designers are quite adept at using this tool, many photographers the world over have been furiously waving magic wands and magnetic lassos at the megapixel army and putting graphics tablets on their shopping lists each year in an attempt to avoid recognizing the contribution that this unique tool has to offer.

Not everything you can see with your eye can be selected easily with a selection technique based on color or tonal values. The resulting ragged selections can be fixed in Quick Mask mode, but sometimes not without a great deal of effort. The question then comes down to ‘how much effort am I prepared to apply, and for how long?’ It‘s about this time that many image-editors decide to better acquaint themselves with the Pen Tool.
Mastering the Pen Tool in order to harness a selection prowess known to few mortals is not something you can do in a hurry — it falls into a certain skill acquisition category, along with such things as teaching a puppy not to pee in the house, called time-based reward, i.e. investing your time over a short period of time will pay you dividends over a longer period of time. The creation of silky smooth curvaceous lines (called paths) that can then be converted into staggeringly smooth curvaceous selections makes the effort of learning the Pen Tool all worthwhile.
Basic Drawing Skills
Vector lines and shapes are constructed from geographical markers (anchor points) connected by lines or curves. Many photographers have looked with curiosity at the vector tools in Photoshop’s Tools palette for years but have dismissed them as ‘not for me’. The reason for this is that drawing vector lines with the Pen Tool for the inexperienced image-editor is like reversing with a trailer for the inexperienced driver. It takes practice, and the practice can be initially frustrating.

The pen can draw a vector shape whilst filling it with a color and applying a layer style—all at the same time. Although tempting, this has nothing to do with selecting a bald man’s head, so we must be sure to disarm this charming little function. We can also use the training wheels, otherwise known as the ‘Rubber Band’ option, by clicking on the menu options next to ‘Mr Blobby‘.
Basics Step 1
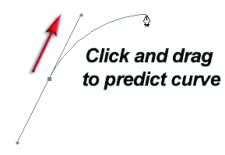
Go to File > New and create a new blank document. Choose ‘White’ as the ‘Background Contents’. Size is not really important (no really—in this instance anything that can be zoomed to fill the screen will serve your purpose). Click on the Pen Tool (double-check the ‘Paths’ option, rather than the ‘Shape layers’ option, is selected in the Options bar) and then click and drag (hold down the mouse clicker as you drag your mouse) in the direction illustrated above. The little black square in the center of the radiating lines is called an anchor point. The lines extending either side of this anchor point are called direction lines, with a direction point on either end, and that thing waving around (courtesy of the Rubber Band option) is about to become the path with your very next click of the mouse.
Basics Step 2
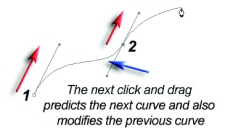
Make a second click and drag in the same direction. Notice how the dragging action modifies the shape of the previous curved line. Go to the ‘Edit’ menu and select ‘Undo’. Try clicking a second time and dragging in a different direction. Undo a third time and this time drag the direction point a different distance from the anchor point. The thing you must take with you from this second step is that a curve (sometimes referred to as a Bézier curve) is both a product of the relative position of the two anchor points either side of the curve, and the direction and length of the two direction lines (the distance and direction of the dragging action).
Basics Step 3
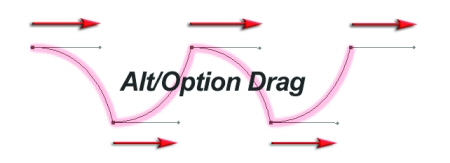
Scenario one: Let us imagine that the first click and drag action has resulted in a perfect curve; the second dragging action is not required to perfect the curve but instead upsets the shape of this perfect curve—so how do we stop this from happening? Answer: Hold down the Alt key (PC) or Option key (Mac) and then drag away from the second anchor point to predict the shape of the next curve. This use of the Alt/Option key cancels the first direction line that would otherwise influence the previous curve.
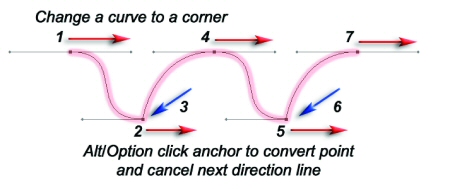
Scenario two: Let us imagine that we have created the first perfect curve using two normal click and drag actions (no use of a modifier key). The direction lines that are perfecting the first curve are, however, unsuitable for the next curve—so how do we draw the next curve whilst preserving the appearance of the first curve? Answer: The last anchor point can be clicked whilst holding down the Alt/Option key.
This action converts the smooth anchor point to a corner anchor point, deleting the second direction line. The next curved shape can then be created without the interference of an inappropriate direction line. Note: The information that you need to take from this third step is that sometimes direction lines can upset adjacent curves. The technique of cancelling one of the direction lines using a modifier key makes a series of perfect curves possible. These two techniques are especially useful for converting smooth points into corner points on a path.
Basics Step 4
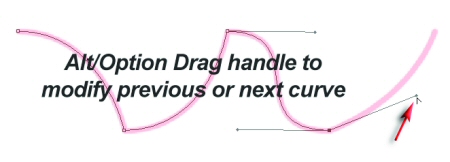
Just a few more steps and we can go out to play. It is possible to change direction quickly on a path without cancelling a direction line. It is possible to alter the position of a direction line by moving the direction point (at the end of the line) independently of the direction line on the other side of the anchor point. To achieve this simply position the mouse cursor over the direction point and, again using the Alt/Option key, click and drag the direction point to a new position.
Basics Step 5
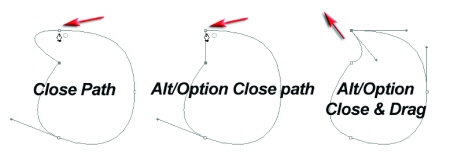
If this path is going to be useful as a selection, it is important to return to the start point. Clicking on the start point will close the path. As you move the cursor over the start point the Pen Tool will be accompanied by a small circle to indicate that closure is about to occur. You will also notice that the final curve is influenced by the first direction line of the starting anchor point. Hold down the Alt/Option key when closing the path to cancel this first direction line. Alternatively, hold down the Alt/Option key and drag a new direction line to perfect the final curve.
Basics Step 6
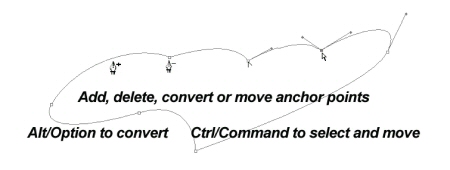
When a path has been closed it is possible to add, delete, convert or move any point. Although these additional tools are available in the Tools palette they can all be accessed without moving your mouse away from the path in progress. If the Auto Add/Delete box has been checked in the Options bar you simply have to move the Pen Tool to a section of the path and click to add an additional point (the pen cursor sprouts a plus symbol). If the Pen Tool is moved over an existing anchor point you can simply click to delete it.
Holding down the Ctrl key (PC) or Command key (Mac) will enable you to access the Direct Selection Tool (this normally lives behind the Path Selection Tool). The Direct Selection Tool has a white arrow icon and can select and move a single anchor point (click and drag) or multiple points (by holding down the Shift key and clicking on subsequent points). The Path Selection Tool has to be selected from the Tools palette and is able to select the entire path.
Basics Step 7
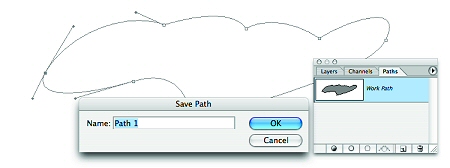
The final step in the creation of a Path is to save it. All Paths, even Work Paths, are saved with the image file (PSD, PDF, PSB, JPEG or TIFF). If, however, a Work Path is not active (such as when the file is closed and reopened) and then the Pen Tool is inadvertently used to draw a new Path, any previous Work Path that was not saved is deleted. Click on the Paths palette tab and then double-click the Work Path.
This will bring up the option to save and name the Work Path and ensure that it cannot be deleted accidentally. To start editing an existing Path click on the path in the Paths palette and then choose either the Direct Selection Tool or the Pen Tool in the Tools palette. Click near the Path with the Direct Selection Tool to view the handles and the Path.
The Pen Tool is often used in the creation of sophisticated smooth-edged selections, but strictly speaking it is not one of the selection tools. The Pen Tool creates vector paths instead of selections; these, however, can be converted into selections that in turn can be used to extract or mask groups of pixels.
The Pen Tool has an unfortunate reputation — neglected by most, considered an awkward tool by those who have made just a passing acquaintance, and revered by just a select few who have taken a little time to get to know ‘the one who sits next to Mr Blobby’ (custom shape icon) in the Tools palette.
Who exactly is this little fellow with the ‘ye olde’ ink nib icon and the awkward working persona? The Pen Tool was drafted into Photoshop from Adobe Illustrator. Although graphic designers are quite adept at using this tool, many photographers the world over have been furiously waving magic wands and magnetic lassos at the megapixel army and putting graphics tablets on their shopping lists each year in an attempt to avoid recognizing the contribution that this unique tool has to offer.

Not everything you can see with your eye can be selected easily with a selection technique based on color or tonal values. The resulting ragged selections can be fixed in Quick Mask mode, but sometimes not without a great deal of effort. The question then comes down to ‘how much effort am I prepared to apply, and for how long?’ It‘s about this time that many image-editors decide to better acquaint themselves with the Pen Tool.
Mastering the Pen Tool in order to harness a selection prowess known to few mortals is not something you can do in a hurry — it falls into a certain skill acquisition category, along with such things as teaching a puppy not to pee in the house, called time-based reward, i.e. investing your time over a short period of time will pay you dividends over a longer period of time. The creation of silky smooth curvaceous lines (called paths) that can then be converted into staggeringly smooth curvaceous selections makes the effort of learning the Pen Tool all worthwhile.
Basic Drawing Skills
Vector lines and shapes are constructed from geographical markers (anchor points) connected by lines or curves. Many photographers have looked with curiosity at the vector tools in Photoshop’s Tools palette for years but have dismissed them as ‘not for me’. The reason for this is that drawing vector lines with the Pen Tool for the inexperienced image-editor is like reversing with a trailer for the inexperienced driver. It takes practice, and the practice can be initially frustrating.

The pen can draw a vector shape whilst filling it with a color and applying a layer style—all at the same time. Although tempting, this has nothing to do with selecting a bald man’s head, so we must be sure to disarm this charming little function. We can also use the training wheels, otherwise known as the ‘Rubber Band’ option, by clicking on the menu options next to ‘Mr Blobby‘.


Basics Step 1
Go to File > New and create a new blank document. Choose ‘White’ as the ‘Background Contents’. Size is not really important (no really—in this instance anything that can be zoomed to fill the screen will serve your purpose). Click on the Pen Tool (double-check the ‘Paths’ option, rather than the ‘Shape layers’ option, is selected in the Options bar) and then click and drag (hold down the mouse clicker as you drag your mouse) in the direction illustrated above. The little black square in the center of the radiating lines is called an anchor point. The lines extending either side of this anchor point are called direction lines, with a direction point on either end, and that thing waving around (courtesy of the Rubber Band option) is about to become the path with your very next click of the mouse.
Basics Step 2
Make a second click and drag in the same direction. Notice how the dragging action modifies the shape of the previous curved line. Go to the ‘Edit’ menu and select ‘Undo’. Try clicking a second time and dragging in a different direction. Undo a third time and this time drag the direction point a different distance from the anchor point. The thing you must take with you from this second step is that a curve (sometimes referred to as a Bézier curve) is both a product of the relative position of the two anchor points either side of the curve, and the direction and length of the two direction lines (the distance and direction of the dragging action).

Basics Step 3
Scenario one: Let us imagine that the first click and drag action has resulted in a perfect curve; the second dragging action is not required to perfect the curve but instead upsets the shape of this perfect curve—so how do we stop this from happening? Answer: Hold down the Alt key (PC) or Option key (Mac) and then drag away from the second anchor point to predict the shape of the next curve. This use of the Alt/Option key cancels the first direction line that would otherwise influence the previous curve.

Scenario two: Let us imagine that we have created the first perfect curve using two normal click and drag actions (no use of a modifier key). The direction lines that are perfecting the first curve are, however, unsuitable for the next curve—so how do we draw the next curve whilst preserving the appearance of the first curve? Answer: The last anchor point can be clicked whilst holding down the Alt/Option key.
This action converts the smooth anchor point to a corner anchor point, deleting the second direction line. The next curved shape can then be created without the interference of an inappropriate direction line. Note: The information that you need to take from this third step is that sometimes direction lines can upset adjacent curves. The technique of cancelling one of the direction lines using a modifier key makes a series of perfect curves possible. These two techniques are especially useful for converting smooth points into corner points on a path.

Basics Step 4
Just a few more steps and we can go out to play. It is possible to change direction quickly on a path without cancelling a direction line. It is possible to alter the position of a direction line by moving the direction point (at the end of the line) independently of the direction line on the other side of the anchor point. To achieve this simply position the mouse cursor over the direction point and, again using the Alt/Option key, click and drag the direction point to a new position.

Basics Step 5
If this path is going to be useful as a selection, it is important to return to the start point. Clicking on the start point will close the path. As you move the cursor over the start point the Pen Tool will be accompanied by a small circle to indicate that closure is about to occur. You will also notice that the final curve is influenced by the first direction line of the starting anchor point. Hold down the Alt/Option key when closing the path to cancel this first direction line. Alternatively, hold down the Alt/Option key and drag a new direction line to perfect the final curve.

Basics Step 6
When a path has been closed it is possible to add, delete, convert or move any point. Although these additional tools are available in the Tools palette they can all be accessed without moving your mouse away from the path in progress. If the Auto Add/Delete box has been checked in the Options bar you simply have to move the Pen Tool to a section of the path and click to add an additional point (the pen cursor sprouts a plus symbol). If the Pen Tool is moved over an existing anchor point you can simply click to delete it.
Holding down the Ctrl key (PC) or Command key (Mac) will enable you to access the Direct Selection Tool (this normally lives behind the Path Selection Tool). The Direct Selection Tool has a white arrow icon and can select and move a single anchor point (click and drag) or multiple points (by holding down the Shift key and clicking on subsequent points). The Path Selection Tool has to be selected from the Tools palette and is able to select the entire path.

Basics Step 7
The final step in the creation of a Path is to save it. All Paths, even Work Paths, are saved with the image file (PSD, PDF, PSB, JPEG or TIFF). If, however, a Work Path is not active (such as when the file is closed and reopened) and then the Pen Tool is inadvertently used to draw a new Path, any previous Work Path that was not saved is deleted. Click on the Paths palette tab and then double-click the Work Path.
This will bring up the option to save and name the Work Path and ensure that it cannot be deleted accidentally. To start editing an existing Path click on the path in the Paths palette and then choose either the Direct Selection Tool or the Pen Tool in the Tools palette. Click near the Path with the Direct Selection Tool to view the handles and the Path.
by Mark Galer
Comments
Post a Comment
Please register before posting your comment here !!