How To Crop An Image In Photoshop
Before I tell you how, I should really answer why. With most photographers capturing images in excess of 8-Megapixels you have way more pixels than you need for most ‘normal’ everyday uses. Uploading an 8-megapixel image to an online gallery or eBay is overkill (there are only 2-megapixels on a full HD widescreen TV!).
The second reason you should crop an image is ensure that it is the correct shape (there is no use giving somebody an oblong image if their one and only photo frame is square). The third reason you should crop is to improve the composition (which is another way of saying that it is a good idea to get rid of all of the uninteresting or distracting parts of the image that you don’t want people to see). You can enhance or improve the image by just cutting, or cropping, the unwanted parts of the image off. This will make people think you are a much better photographer than you really are!

Fig 10 Crop to improve the composition/framing
Most of the time I am cropping twice. The first time is to improve the visual appearance of the image and the second time so that it fits my output space (screen or print frame). Before cropping I would definitely recommend duplicating the image.
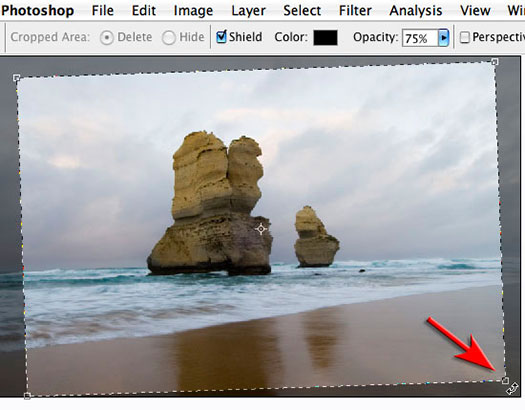
The first crop can be done without entering any measurements or specification in the Options bar just below the main menus. Just click and drag the cropping tool over the image until you have selected what you want (the rectangle of ‘marching ants’ that you now see is called a ‘Crop Marquee’). After dragging a crop marquee over the image Photoshop gives you the chance to refine your crop.
Just go to any of the handles in the corner or on the edges of the marquee and then click and drag to change the shape of the crop. Placing your mouse cursor just outside one of the corner handles will allow you to rotate the crop marquee (great for straightening a crooked image). Click and drag inside the crop marquee to move the marquee to a new location. Hit the ‘Return/Enter’ key to commit the crop action or hit the ‘Escape’ key to cancel out. These options are also available in the Options bar at the top of the screen.

Fig 11 Crop so that your image ‘fits’ your intended purpose
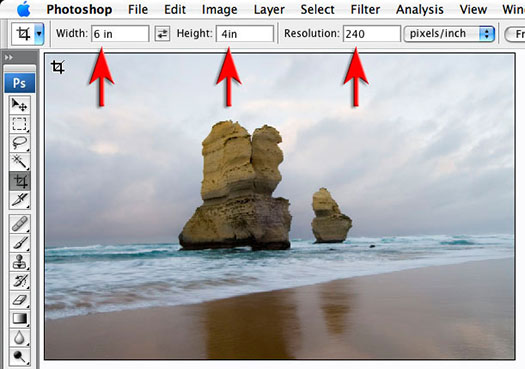
The second time you crop you will want to crop the image to a specific shape and resolution for a specific output device – web image, photo frame or album page.
To do this we enter in the dimensions required in the Options bar. In order to enter in the correct information in the Options bar you need to know something about the subject of resolution (see the answer to the next question).
The second reason you should crop an image is ensure that it is the correct shape (there is no use giving somebody an oblong image if their one and only photo frame is square). The third reason you should crop is to improve the composition (which is another way of saying that it is a good idea to get rid of all of the uninteresting or distracting parts of the image that you don’t want people to see). You can enhance or improve the image by just cutting, or cropping, the unwanted parts of the image off. This will make people think you are a much better photographer than you really are!

Fig 10 Crop to improve the composition/framing
Most of the time I am cropping twice. The first time is to improve the visual appearance of the image and the second time so that it fits my output space (screen or print frame). Before cropping I would definitely recommend duplicating the image.
The first crop can be done without entering any measurements or specification in the Options bar just below the main menus. Just click and drag the cropping tool over the image until you have selected what you want (the rectangle of ‘marching ants’ that you now see is called a ‘Crop Marquee’). After dragging a crop marquee over the image Photoshop gives you the chance to refine your crop.
Just go to any of the handles in the corner or on the edges of the marquee and then click and drag to change the shape of the crop. Placing your mouse cursor just outside one of the corner handles will allow you to rotate the crop marquee (great for straightening a crooked image). Click and drag inside the crop marquee to move the marquee to a new location. Hit the ‘Return/Enter’ key to commit the crop action or hit the ‘Escape’ key to cancel out. These options are also available in the Options bar at the top of the screen.

Fig 11 Crop so that your image ‘fits’ your intended purpose
The second time you crop you will want to crop the image to a specific shape and resolution for a specific output device – web image, photo frame or album page.
To do this we enter in the dimensions required in the Options bar. In order to enter in the correct information in the Options bar you need to know something about the subject of resolution (see the answer to the next question).

Comments
Post a Comment
Please register before posting your comment here !!