Photo Optimization Tips
Some people have turned editing images into a science and an art form all rolled into one, but it is possible to get some good results by just hitting a few buttons that have the word ‘Auto’ written on them. Most digital images will benefit from a couple of simple ‘quick fixes’ to optimise the color and contrast. The camera may have done a reasonable job but the chances are that Photoshop will be able to further improve the image (well that’s why you purchased the software right). If you are new to digital image-editing then Photoshop will complete these steps automatically with just a click of the mouse and do a pretty good job pretty much most of the time. Just duplicate the original image first (just in case you make a pig’s ear out of things and want to start again).
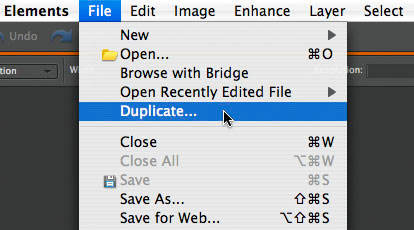
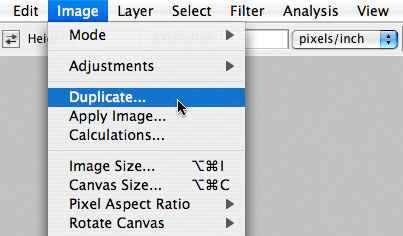
Fig 05 Duplicate the original image file before modifying it
Elements users: Go to File > Duplicate.


Fig 05 Duplicate the original image file before modifying it
Elements users: Go to File > Duplicate.
Photoshop CS/CS2/CS3 users: Go to Image > Duplicate.
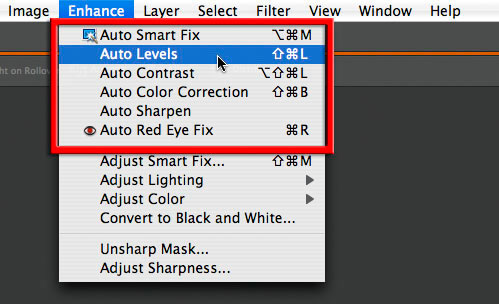
Fig 06 Choose ‘Auto’ in Elements for fast optimization of your images
Elements users: Go to the ‘Enhance’ menu and choose any combination of the six auto settings including ‘Auto Red Eye Fix’ and ‘Auto Sharpen’. Most digital images benefit from some additional sharpening inside Photoshop. The next step for Elements users who want a little more control than simply hitting the auto buttons should consider going to the Quick Fix module in Elements. In this space you can hit the auto buttons or manually drag the sliders to increase or decrease the effects of the color and tonal adjustments.
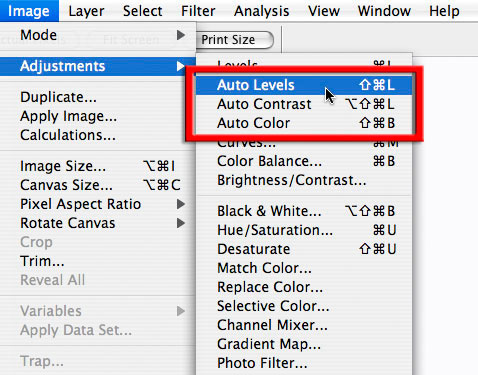
Fig 07 Choose ‘Auto’ in Photoshop for fast optimization of your images
Photoshop CS/CS2/CS3 users: Go to Image > Image Adjustments and click on ‘Auto Levels’, ‘Auto Contrast’ and ‘Auto Color’. Click on one, two or all three to see what Photoshop can do for you. If you don’t like what Photoshop did to your image then go to the ‘Edit’ menu and choose ‘Undo’ one or more times until the image has returned to the starting point. CS/CS2/CS3 users must go to ‘Filter > Sharpen > Sharpen’ to access Photoshop’s auto sharpening and if you want to remove red eye you have to use the ‘Red Eye Tool’ in the ‘Tools’ palette (this lives behind the Spot Healing Brush Tool in CS3). If the color still looks weird on your screen (Photoshop’s auto buttons occasionally get it wrong) then the next step you should take to fix the image is to go to ‘Variations’.

Fig 06 Choose ‘Auto’ in Elements for fast optimization of your images
Elements users: Go to the ‘Enhance’ menu and choose any combination of the six auto settings including ‘Auto Red Eye Fix’ and ‘Auto Sharpen’. Most digital images benefit from some additional sharpening inside Photoshop. The next step for Elements users who want a little more control than simply hitting the auto buttons should consider going to the Quick Fix module in Elements. In this space you can hit the auto buttons or manually drag the sliders to increase or decrease the effects of the color and tonal adjustments.

Fig 07 Choose ‘Auto’ in Photoshop for fast optimization of your images
Photoshop CS/CS2/CS3 users: Go to Image > Image Adjustments and click on ‘Auto Levels’, ‘Auto Contrast’ and ‘Auto Color’. Click on one, two or all three to see what Photoshop can do for you. If you don’t like what Photoshop did to your image then go to the ‘Edit’ menu and choose ‘Undo’ one or more times until the image has returned to the starting point. CS/CS2/CS3 users must go to ‘Filter > Sharpen > Sharpen’ to access Photoshop’s auto sharpening and if you want to remove red eye you have to use the ‘Red Eye Tool’ in the ‘Tools’ palette (this lives behind the Spot Healing Brush Tool in CS3). If the color still looks weird on your screen (Photoshop’s auto buttons occasionally get it wrong) then the next step you should take to fix the image is to go to ‘Variations’.
Elements users: Go to Enhance > Adjust Color > Color Variations.
Photoshop CS/CS2/CS3 users: Go to Image > Adjustment > Variations.
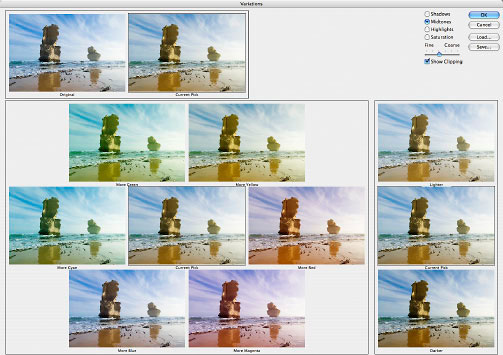
Fig 08 Variations, for when you need to see whether the grass can be greener
Click on the ‘Midtones’ radio button and then move the only slider in this dialog box to increase or decrease the amount of the adjustment being applied to the variety of thumbnails you can see. Just click on the thumbnail your prefer and select ‘OK’ (not rocket science this one). If the grass is greener on the other side just click on it and its yours!
Note > If Variations is grayed out and cannot be selected try going to Image > Mode > 8 Bits/Channel.
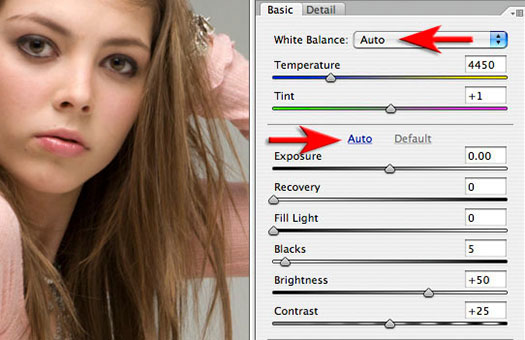
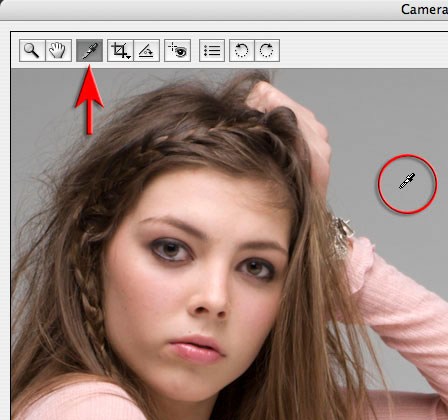
Fig 09 Auto in Camera Raw
Adobe Camera Raw
Professional photographers mostly capture using the Raw format with their digital SLRs rather than the JPEG format. The Raw format offers greater flexibility in achieving different visual outcomes while ensuring a high quality finished result. The processing that is normally done by the camera (white balance, saturation, sharpening etc.) is, instead, carried out in an Adobe Camera Raw interface.
When the file is captured in the Raw format it first has to go through this Adobe Camera Raw interface before it can be opened in Photoshop’s main editing space. This interface has a couple of Auto controls to make the job of processing the Raw data a relatively simple procedure. The Auto White balance setting in the ‘Basic’ panel enables Photoshop to have an attempt at doing a better job than the camera at getting the color correct, while the ‘White Balance Tool’ can be selected and used to click on a neutral tone in the image (a gray tone without any color) to ensure the color balance is correct. The Auto button, just above the ‘Exposure’ slider can also be clicked on to enable Photoshop to optimise the image for you.
If you want even more control to optimise the visual appearance of your image then you should probably consider buying a book. Seriously, some folks have bookshelves of books on the subject. It’s a little like cooking – one is just never enough!
by Mark Galer
Comments
Post a Comment
Please register before posting your comment here !!